Models and Animations
Generating Unreal Editor assets for Models and Animations is an advanced process of many steps, tools, and scripts. This is only intended for advanced users who intend to use the Game's models and animations in their own mods, to create new heists, for example.
Developers who wish to create new assets using the Game's models or replace the Game's models can follow the guide on Using/Replacing Game Assets.
This guide is based on the Generating FBX guide on the UnrealAssetToolkit wiki. If you get stuck or need help, please check there first for the most up-to-date information.
You cannot legally distribute the assets obtained by following this guide without explicit permission from Starbreeze.
This guide assumes you have already completed some or all of the steps for generating assets.
Extracting ActorX files
ActorX is the format Unreal Engine uses internally to represent meshes and animations.
These are files with the .psk, .pskx and .psa extensions.
To obtain these files and their metadata, we will use a fork of CUE4Parse specially created for this task.
git clone https://github.com/Buckminsterfullerene02/CUE4Parse.git --recursive
cd CUE4Parse
git checkout mass-export
Next, open the solution in your tool of choice, Visual Studio (not Code) or Rider are recommended.
Open Program.cs under the AnimExport project.
public class Progam
{
    // SET THESE FOR YOUR GAME
    private const string _pakDir = @"C:\Program Files (x86)\Steam\steamapps\common\PAYDAY 3\PAYDAY3\Content\Paks";
    private const string _aesKey = ""; // If your game does not have an AES key, leave this empty
    private const string _mapping = ""; // If your game does not need a mappings file, leave this empty
    private const EGame  _version = EGame.GAME_UE4_27; // Check if your game has a custom version, as some do
    private const bool   _exportMaterials = false; // This needs to be false if generating for CAS+UEAT
    private const bool   _useInternalName = true; // Sometimes package path is not set properly meaning paths are not synced, so if it isn't, set to true
    private const string _outputDir = @"C:\Users\YourUser\Documents\AssetToolkit\AnimExport";
    private const bool   _replaceFiles = false;
    private const bool   _printSuccess = true; // Once you've verified this works, set this to false to reduce console spam
    private const bool   _hasStrippedAssetRegistry = false;
    private static readonly List<string> _folderNames = new() { "Anims", "Anims", "Anims", "SKMs", "SMs", "SKs" };

    // DO NOT TOUCH ANYTHING BELOW THIS LINE

    // ...
}
- Set
_pakDirto the path to your game'sPaksdirectory. - Set
_aesKeyto the game's PAK AES encryption key, you should be able to source this pretty easily. - Set
_versionto the Unreal Engine version the game is using. As of writing this article, the Unreal Engine version is 4.27. - Set
_outputDirto the directory where you want to output the ActorX and JSON files. This directory should be empty. - Leave all other fields set to their default values as shown above.
Finally, run the Main method of the AnimExport project. This will create the following in your output directory:
- Anims: Animation Sequences, Montages and Compositions
- SKMs: Skeletal Meshes
- SMs: Static Meshes
- SKs: Skeletons
Converting to FBX
In this part, we will use Blender and some custom plugins to import the ActorX files and export them in FBX format. If you don't already have Blender installed, you can download the latest version from the Blender downloads page.
With Blender installed, we will need to add two plugins from GitHub:
- blender3d_import_psk_psa: download the repository as zip
- psk_psa_batch_export.py: download just the python file
Place these under %AppData%\Roaming\Blender Foundation\Blender\3.6\scripts\addons.
You might need to open Blender first for it to create this path. You can add any missing directories yourself.
You may need to fix these two imports in psk_psa_batch_export.py manually:
# ...

import re
import os
import json
import bpy
from bpy.types import Scene
from bpy.props import (BoolProperty,
                        StringProperty,
                        EnumProperty,
                        PointerProperty )
from io_import_scene_unreal_psa_psk_280.io_import_scene_unreal_psa_psk_280 import pskimport
from io_import_scene_unreal_psa_psk_280.io_import_scene_unreal_psa_psk_280 import psaimport
With the addons in place, we will need to enable them from the Blender interface.
Go to Edit -> Preferences -> Addons,
and enable the Import: ActorX to FBX for Unreal and Import-Export: Import Unreal Skeleton Mesh (.psk)/Animation Set (.psa) (280) addons.
Before you do the next steps, navigate to Window -> Toggle system console.
This will help give you an indicator of what it's currently doing,
as the main blender window will completely freeze when running the mass export.
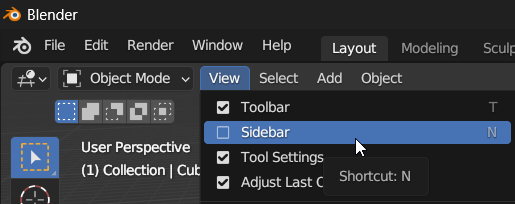
Next, open the sidebar by going toggling View -> Sidebar, or by simply pressing N.

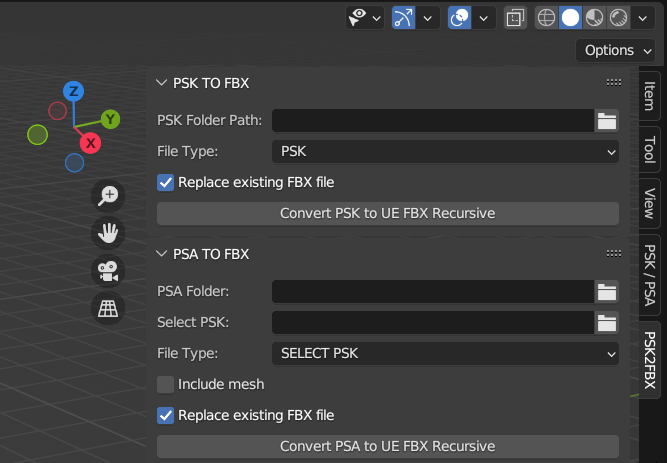
From the sidebar, select the PSK2FBX tab.

- Run
Convert PSK to UE FBX Recursivewith- the file type
PSK - the PSK Folder Path set to
SKMs
- the file type
- Run
Convert PSK to UE FBX Recursivewith- the file type
PSKX - the PSK Folder Path set to
SMs
- the file type
- Run
Convert PSA to UE FBX Recursivewith- the file type
USE FOLDER - the PSA Folder
Anims - the Skeleton Folder set to
SKs/Blender
- the file type
Generating animations has not yet been tested.
Moving the FBX
Now we need to copy only the FBX files to the directory UEAssetToolkitGenerator will output serialized assets to. To do this correctly, you can use the copy_fbx_to_cas.py Python script.
cd C:\Users\YourUser\Documents\AssetToolkit
python copy_fbx_to_cas.py .\AnimExport .\CASOutput --internalname PAYDAY3 --types Anims,SMs,SKMs
The first argument is the directory containing the Anims, SMs and SKMs subdirectories.
The second argument is the Result Dir you have set in CAS.
Serializing for import
Open the UEAssetToolkitGenerator, and check your settings:
- AnimSequence, AnimMontage, SkeletalMesh, Skeleton and StaticMesh should not be selected under
Asset Types to Skip Serializing - All checkboxes under
Use ActorX?should be disabled Force mesh JSON to have one LOD?should be enabled
Scan the assets and run the serializer. If this is your first time using Cooked Asset Serializer, refer back to the instructions on the main Asset Toolkit documentation page.
Importing into the editor
If you publish the sources of your project as a git repository, you will want to exclude the generated assets.
An easy way to do this is to first git stash any pending changes you currently have.
Then after generating the assets you can simply add everything under Content to your .gitignore file.
If you have not yet generated texture/material assets in your project, now would be the time to do so.
Static Meshes
In your editor, navigate to Window -> Developer Tools -> Asset Generator.
Generating static meshes suffers from video memory leaks,
so you will want to do this in multiple passes.
The environment directory is the largest, so start by generating everything except that.
Restart the editor after each run to clear your video memory.
Skeletal Meshes
Repeat the process above for skeletal meshes. These meshes include characters, vehicles and weapons.
Animations
Generating animations has not yet been tested.