Asset Toolkit
This documentation page explains the process performed to create the template project. Additionally, you can use parts of this guide and its subpages to supplement the template project with assets which could not be included due to copyright reasons.
A ready-made template project is available for you to use, which will soon include most assets used by the game. This page exists only for the curious and for documentation purposes.
Generating the project
This part of the guide is incomplete. If you're using the template project as a base for asset generation, you can continue below.
Dumping Game Assets
First, we need to extract all of the game's archives.
These are located under {GAME_DIRECTORY}\PAYDAY3\Content\Paks.
It is recommended to use repak,
you can download it and add it to your PATH or place it in the Paks directory.
cd C:\Program Files (x86)\Steam\steamapps\common\PAYDAY 3 Playtest\PAYDAY3\Content\Paks
repak.exe --aes-key 0xABCDEF12345789 unpack --output out $(Resolve-Path *.pak)
The AES encryption key is not shared publicly at this time, as we have not received explicit permission from Starbreeze to do so. However, you should be able to source it yourself quite easily by googling around.
Serializing to JSON
Next, we need to serialize the extracted assets to the JSON format understood by the AssetGenerator plugin. To do this, we need a tool called UEAssetToolkitGenerator, also known as CAS or CookedAssetSerializer.
Additional information on this tool can be found on the UEAssetToolkitGenerator Wiki.
General Settings
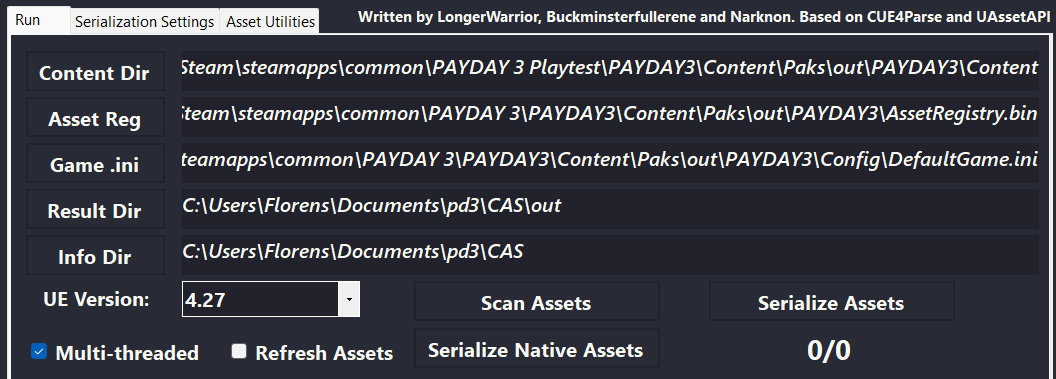
In the Run tab of the program, you need to set five paths:
- Content Dir: in the extracted
.pakfiles atPAYDAY3\Content - Asset Reg: in the extracted
.pakfiles atPAYDAY3\AssetRegistry.bin - Game .ini: in the extracted
.pakfiles atPAYDAY3\Config\DefaultGame.ini - Result Dir: the directory to write the serialized files to, make sure this is empty
- Info Dir: the directory to output asset scan results and logs files to
Then, before starting the serialization process, make sure to set the right Engine Version (4.27 at the time of writing) and enable Multi-threaded.
Running serialization with multi-threading is experimental but speeds up the process 10x. If you want to be extra sure there are no faults in the output, you can simply run the serialization process more than once with Refresh Assets disabled.
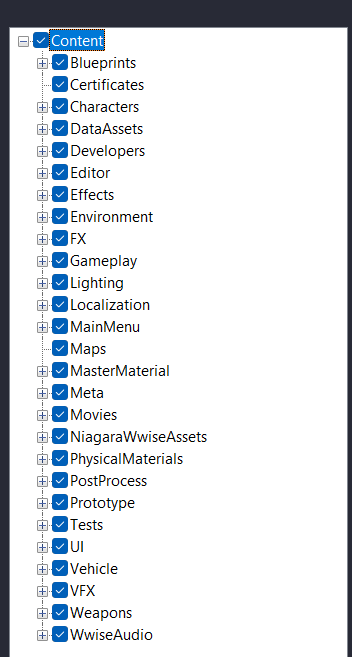
In the panel on the right, make sure you have everything checked. This ensures you have all the assets you want, plus all the assets those assets reference. If you only want to add a small selection of assets to your editor project, then you can filter this in the next section.
Next we can run Scan Assets, which will locate all available assets and their type.
Serialization settings
Next, we'll make some changes in the Serialization Settings tab. Unless you know what you're doing, we'll keep Asset Types to Skip Serializing and Asset Types to Dummy set to their defaults. We will however be adding Simple Assets. These are custom asset types created by the developers, such as Data Assets.
To do this, click the Open Asset List button at the bottom of the Run tab.
From this file, copy every line that starts with /Script/Starbreeze.
Finally, go back to the Serialization Settings tab and
add these lines into Simple Assets and Assets with as circular Dependency, without removing existing entries.
You don't need to worry about the formatting, the program will ignore any quotes and commas.
Generating Editor Assets
Additional information on this tool can be found on the UEAssetToolkit Wiki.
Installing the Asset Generator editor plugin
Download UEAssetToolkit
by cloning it or downloading it as a zip file.
Then move the AssetGenerator and AssetDumper directories to your project's Plugins directory.
If your editor is already open, you will have to restart to compile and load the plugin.
Generating Assets
These instructions are incomplete.
Go to Windows -> Developer Tools -> Asset Generator.
Textures
To import textures into the editor, you will want to use the command line. Running the Asset Generator from the editor for these two asset types is too unstable.
UE4Editor-Cmd.exe "C:\path\to\project\PAYDAY3.uproject" -run=AssetGenerator -DumpDirectory="C:\Users\YourUser\Documents\AssetToolkit\CASOutput" -AssetClassWhitelist="Texture2D" -NoRefresh -abslog "C:\path\to\log\gen_log.txt" -stdout -unattended -NoLogTimes
Additionally, even from the command line, it might take a couple of attempts. Due to memory leaks, importing textures can crash many times. If you encounter this issue, you can manually increase the Windows page size.
After the command has run to completion, it is recommended to start the Unreal Editor to check if everything is in the right place and to let shaders compile.
Materials
To import materials into the editor, you can likewise use the command line. This one should take less time than generating textures and require less memory.
UE4Editor-Cmd.exe "C:\path\to\project\PAYDAY3.uproject" -run=AssetGenerator -DumpDirectory="C:\Users\YourUser\Documents\AssetToolkit\CASOutput" -AssetClassWhitelist="Material" -NoRefresh -abslog "C:\path\to\log\gen_log.txt" -stdout -unattended -NoLogTimes
The asset generator breaks on some materials,
you can exclude them by editing IsDumbAsset() in AssetTypeGenerator.cpp:
bool UAssetTypeGenerator::IsDumbAsset()
{
   // ...

    TArray<FString> excludedAssetNames = {
        TEXT("MM_DECAL_Simple")
        TEXT("MMMainMenu_DECAL_Simple"),
    };
    for (const FString& excludedAssetName : excludedAssetNames)
    {
        if (GetAssetName().ToString().Contains(excludedAssetName))
        {
            return true;
        }
    }

    return false;
}
Models and Animations
You can either generate dummy meshes and animations, or follow the instructions on the Models and Animations page to generate fully functional assets.