Static Model Replacements
This guide will explain how to replace a static mesh with your own.
For this guide, we will be using FModel and Blender. If you're adventurous, it's possible to use other tools such as UModel and 3ds Max. You are expected to have an idea of how to use Blender and know the basics of rigging.
A guide on replacing skeletal meshes is not yet available.
Prerequisites
- An installation of the Unreal Editor (same version as the game)
- Basic knowledge of Pak modding. See the pages on modding using the Unreal Editor and Texture Replacements.
- A model exported from the game as
.pskformat using FModel or UModel. - Blender with the blender3d_import_psk_psa plugin installed. Or another model editing program with support for the ActorX format (psk/pskx/psa).
- Basic knowledge of PBR materials and texture packing
Creating your mesh
- Import the
.pskfile you exported using FModel into Blender. - Rig the models accordingly if necessary, some models don't have a skeleton or vertex groups.
- Add three additional "empty" UV maps. To do this, scale them down until they're not visible. This is sometimes necessary to remove masking being applied to the model. You can easily scale them down to invisible by selecting the entire UV, then inputting S (for scale) then 0 (for size 0). Then hit enter.
- Add an empty material assigned to a face, and make it the first slot. This is sometimes necessary to remove masking being applied to the model. It is not the case with all models, however, it's a good habit to include it.
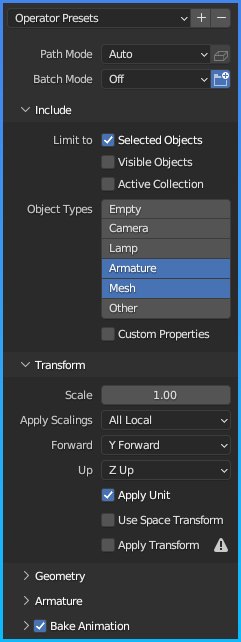
- Export the model as
.fbxwith the following settings:
Importing in Unreal Engine
- You will need to set up the correct project hierarchy, using the money bag model as an example,
the hierarchy is as follows:
Content/Gameplay/Player/Props/Moneybag_01/Meshes - Always remember that Unreal projects make the
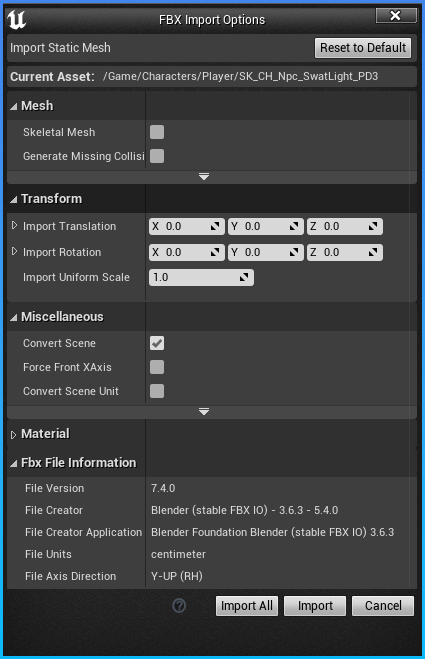
Contentfolder for you. So start your path recreation fromContent/ - Import the .FBX with these settings if you're importing a static mesh:
Stubbing a master material
Due to an unresolved issue, it is not yet possible to create fully custom materials. With a bit of work, we can still do most things by creating a new material instance from one of the game's built in master materials.
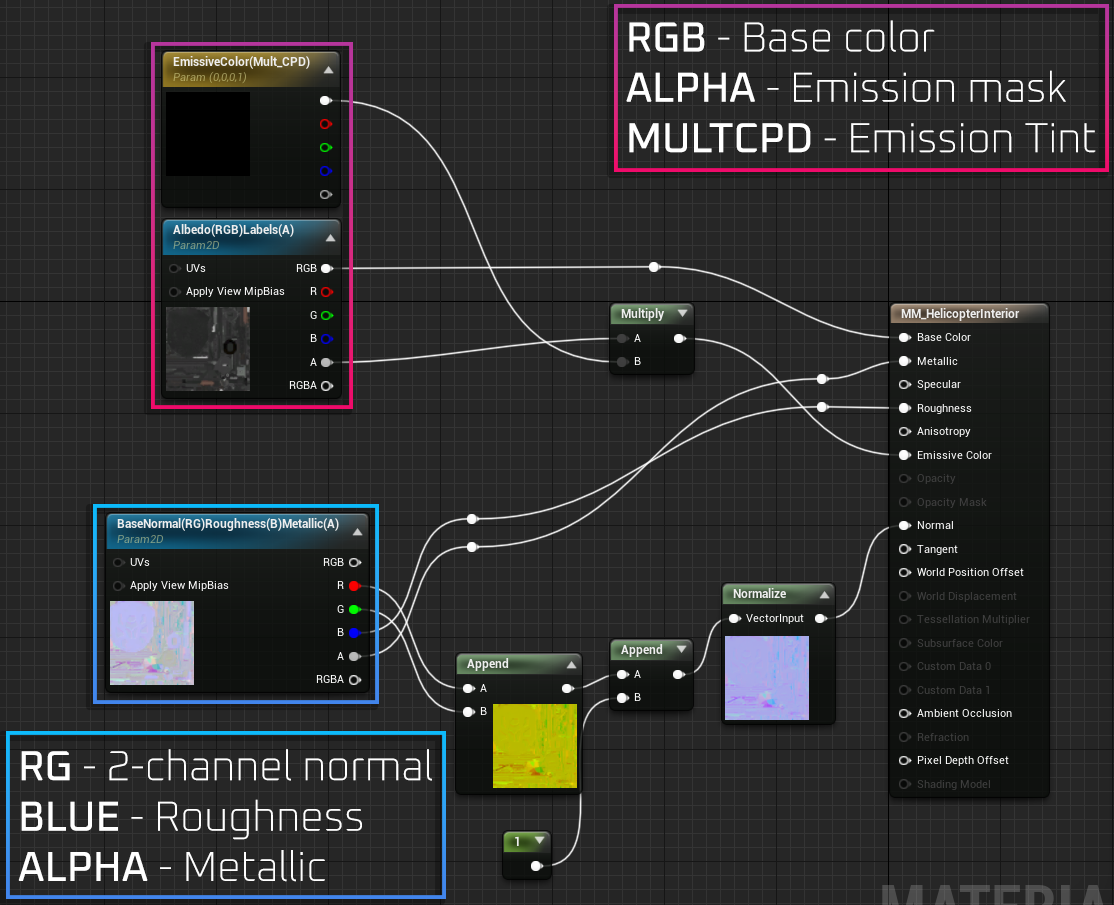
For this guide, we will be using the MM_HelicopterInterior master material.
Don't worry about the name of this material, it should be fit for most purposes.
To stub the material from the game,
create a new Material in your editor called MM_HelicopterInterior under Content/MasterMaterial/Vehicles/Helicopter.
Next, we'll have to edit the material to add some parameters we want to use in our material instance. If you want the editor preview of the mesh to look approximately like it will in-game, you can replicate the setup below. If you don't mind what it looks like in the editor, you can simply add the parameters and hook them up to any material output.
You can find many more master materials and their available parameters in the asset-gen branch of the modkit. This project has all the master materials from the game pre-generated for you, but keep in mind that the parameters are not hooked up correctly to the output node.
Packing textures
Import your textures somewhere under /Content/Mods/[YourModName],
they will need to have a specific packing in order to work.
The textures for the MM_HelictopterInterior material we used earlier are packed as follows:
- Texture 1 -
Albedo(RGB)Labels(A)- RGB: base color/albedo
- Alpha: emission mask
- Texture 2 -
BaseNormal(RG)Roughness(B)Metallic(A)- RG: 2-channel DirectX normal map
- Blue: roughness
- Alpha: metallic
In order to achieve this, you can use either Substance Painter with an export preset or any image manipulation program.
Substance Painter preset for HelicopterInterior texture packing:
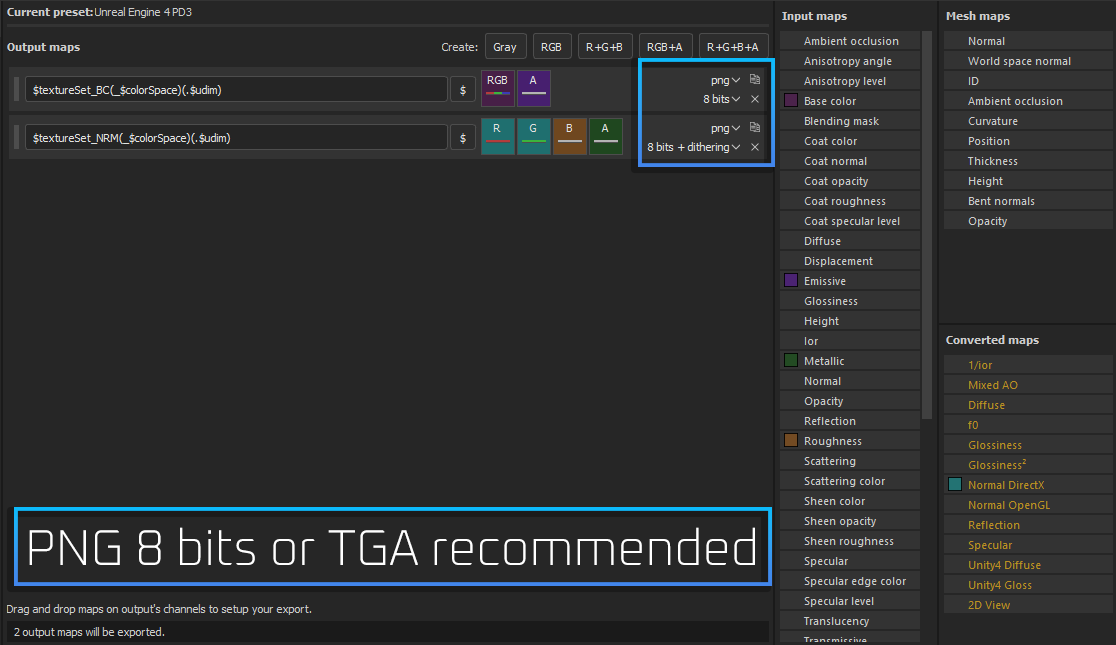
After importing into the editor, set the Compression Settings of the normal texture to Masks or BC7 with sRGB unticked. BC7 results in higher quality but also a bigger file size.
Creating and assigning material instances
Create a material instance from the MM_HelicopterInterior material,
and place it somewhere under /Content/Mods/[YourModName].
Open your newly created material instance and assign the two texture parameters.
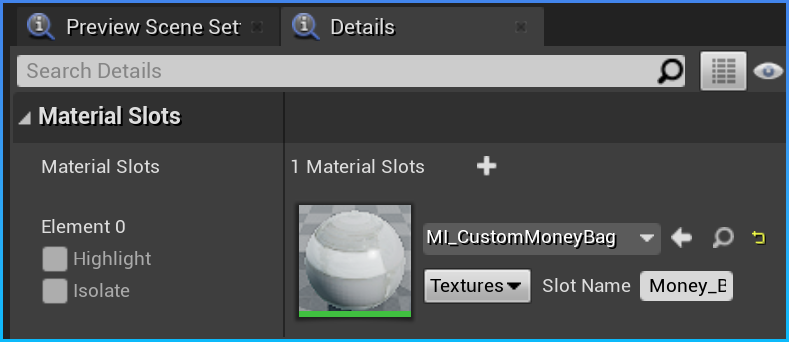
Finally, you can open up your model and assign the material instance(s) accordingly.
Cooking and packing
To learn how to package this correctly,
see the cooking and packaging sections of the Unreal Engine guide.
You will need to include:
- The mesh you're replacing, for example
PAYDAY3/Content/Gameplay/Player/Props/Moneybag_01/Meshes/MoneyBag_01_PD3.uasset - Everything under
PAYDAY3/Content/Mods/[YourModName], this should have your material instances and textures
Do not include the master material stub (MM_HelicopterInterior if you followed the guide exactly).
It is only intended to give your material instance the correct reference to the in-game asset.
Testing the mod
Put your .pak file in the game's Paks directory under PAYDAY3/PAYDAY3/Content/Paks/~mods.
The model should now appear in-game if you've done everything correctly.